Creating a fairy garden pot is a fun and imaginative way to bring a touch of magic to your outdoor space, or even indoors! These charming miniature landscapes can be made from various types of pots and containers, allowing for endless creativity. Whether you're using traditional flower pots, repurposing vintage items, or opting for sleek modern designs, the possibilities are vast. Let’s look at some delightful ideas to inspire your next fairy garden project!
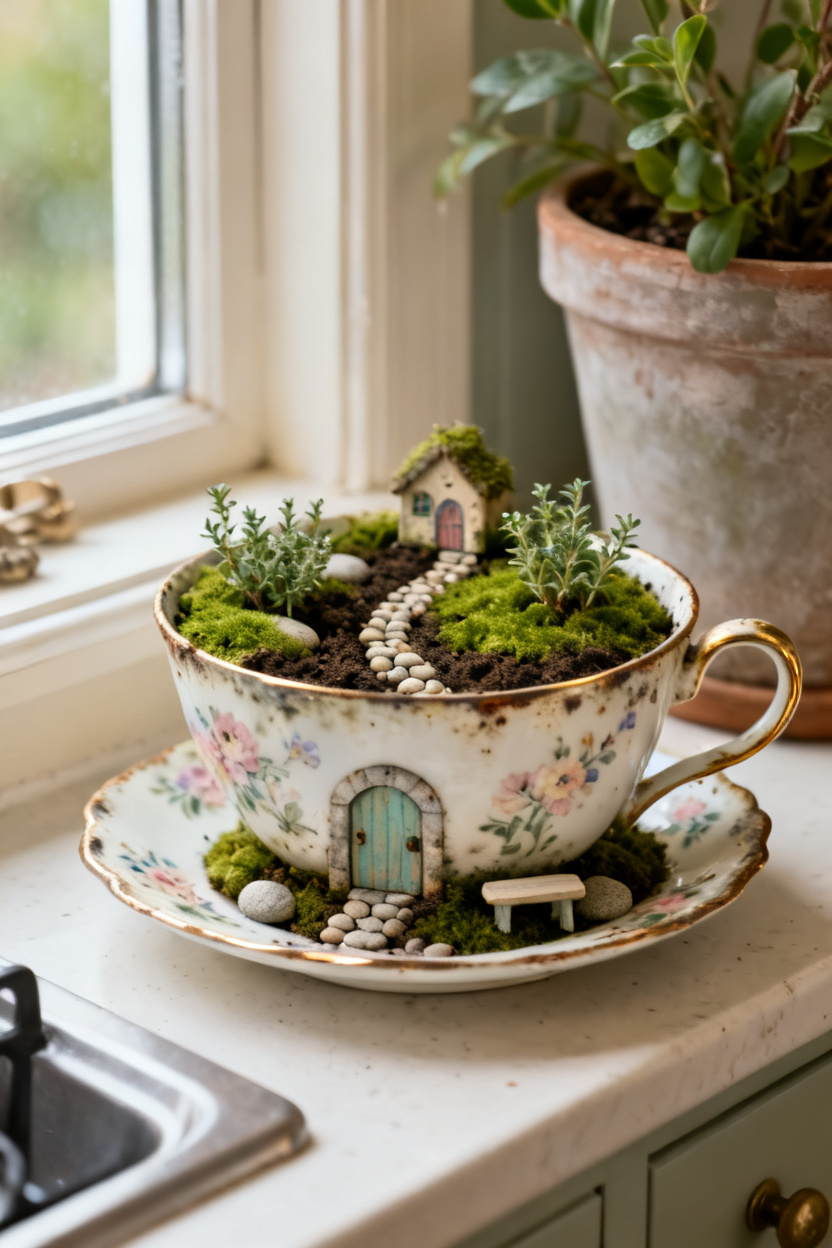
Teacup Fairy Garden Pot With Miniature Door And Pebble Path

Imagine a charming teacup transformed into a delightful fairy garden. This whimsical setup features a miniature door, inviting tiny fairies to come and go. The teacup is filled with vibrant flowers and lush greenery, creating a lively scene that sparks joy.
The tiny door adds a magical touch, making it feel like a secret entrance to a fairy realm. Surrounding the door, colorful pebbles create a path that leads to the enchanting abode. This little detail enhances the overall charm, making it a perfect focal point for any garden or indoor space.
In this fairy garden, you’ll find adorable miniature figures, including a fairy and a little girl, adding life to the scene. These figures invite imagination and storytelling, making it a fun project for kids and adults alike. You can easily customize the characters and plants to reflect your personal style.
Creating a teacup fairy garden is simple and enjoyable. Start by gathering a teacup, some potting soil, and your favorite small plants. You can also add decorative stones and tiny figures to enhance the magic. This project not only beautifies your space but also provides a wonderful way to express creativity.
Transform A Terracotta Pot Into A Woodland Fairy Home

Creating a woodland fairy home from a terracotta pot is a delightful project that brings a touch of magic to your garden. This charming little house, complete with a whimsical roof and tiny fairy figures, is perfect for sparking imagination. The earthy tones of the pot blend beautifully with the vibrant greens of the surrounding plants.
Start by choosing a terracotta pot that suits your space. The size can vary, but a medium-sized pot works well for this project. You can paint the pot if you want to add some color, but leaving it natural gives it a rustic feel. Next, add some soil and small plants or moss around the base to create a lush environment.
For the fairy home itself, consider adding miniature decorations. Tiny doors and windows can be crafted from twigs or purchased from craft stores. Place small fairy figurines on the porch or inside to bring the scene to life. You can also add pebbles, flowers, and even little lights to enhance the magical atmosphere.
Don’t forget to personalize your fairy home! Use items like shells, acorns, or colorful stones to decorate. Each element can tell a story, making your fairy garden unique. This project is not just for adults; kids will enjoy helping out, too. It’s a wonderful way to bond while creating something special together.
Broken Pot Fairy Garden With Layered Staircase Design

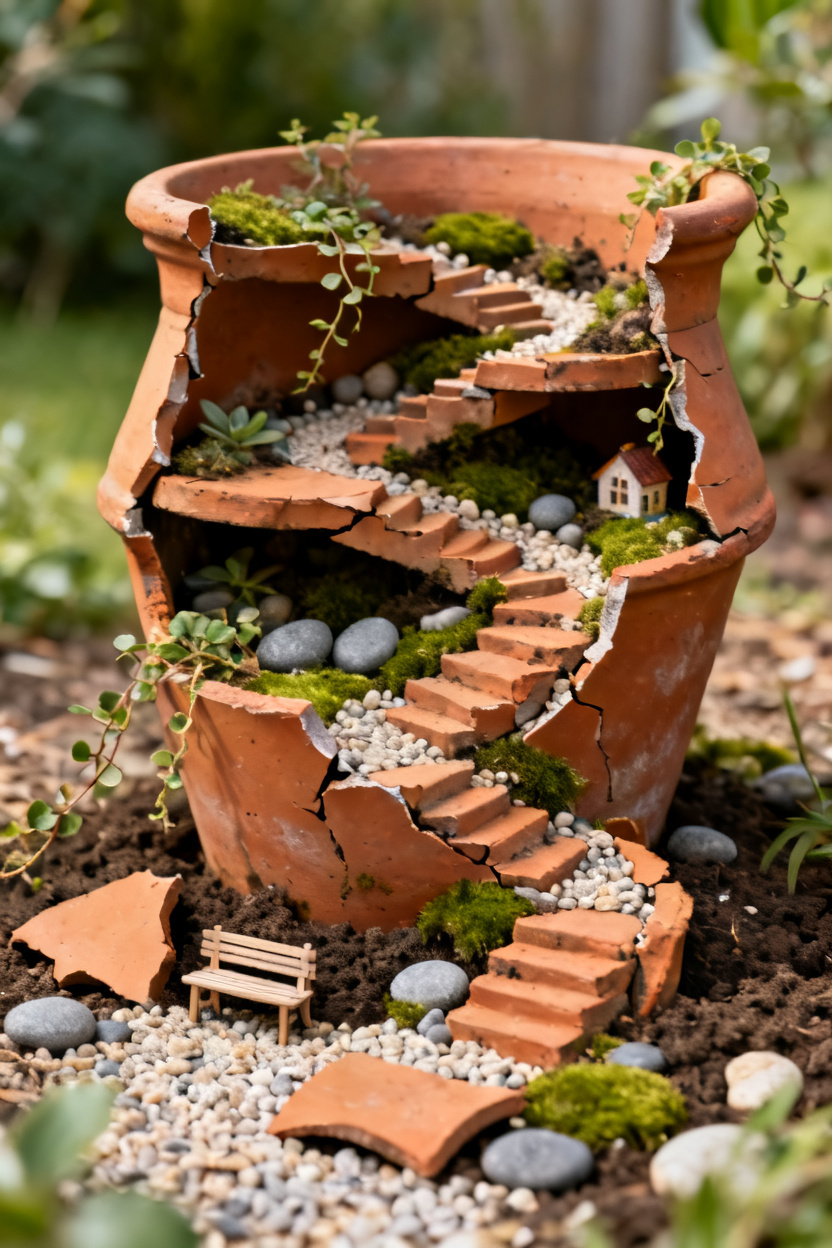
Creating a broken pot fairy garden is a delightful way to add charm to your outdoor space. This design features a layered staircase made from terracotta pots, giving it a unique and whimsical look. The pots are stacked in a way that mimics a cascading staircase, perfect for tiny fairies to explore.
Each level of the staircase can be filled with small plants, pebbles, and decorative elements. Consider using succulents or moss to create a lush environment. The combination of greenery and earthy tones adds to the natural feel of the garden. You can also place miniature fairy figurines on different levels, bringing the scene to life.
To make your fairy garden even more enchanting, think about adding small stones or twigs as pathways. This creates a sense of adventure for the fairies. You can also include tiny accessories like benches or lanterns to enhance the magical atmosphere.
When arranging your fairy garden, play with different heights and textures. This layered design not only looks appealing but also allows for easy maintenance. Watering and caring for the plants is simple, as the pots are easily accessible. Plus, the broken pot design gives a rustic touch that blends beautifully with nature.
Overall, a broken pot fairy garden with a layered staircase design is a fun and creative project. It invites imagination and adds a playful element to any garden. Whether you’re an experienced gardener or just starting out, this idea is sure to bring joy and a bit of magic to your outdoor space.
Create A Succulent Fairy Garden Pot For Low-Maintenance Charm

Creating a succulent fairy garden pot is a fun and easy way to add charm to your space. This image showcases a delightful arrangement of colorful succulents nestled in a terracotta pot. The vibrant greens, pinks, and yellows of the plants bring life to the scene, while tiny figurines and decorative elements enhance the whimsical feel.
Succulents are perfect for this type of garden because they require minimal care. They thrive in well-drained soil and need only occasional watering. This makes them ideal for busy individuals or those new to gardening. Plus, their unique shapes and colors allow for endless creativity in arranging them.
To create your own succulent fairy garden pot, start with a few essential items:
- A terracotta or ceramic pot
- Well-draining potting mix
- A selection of small succulents
- Miniature decorations like figurines, stones, or tiny furniture
Begin by filling your pot with potting mix, leaving some space at the top. Arrange the succulents in a way that pleases your eye. You can cluster them for a fuller look or space them out for a more open feel. Once your plants are in place, add your decorative elements. This could include a tiny fairy, a cute animal, or even a miniature watering can.
Finally, give your garden a light watering and place it in a spot where it can enjoy some sunlight. With just a little effort, you’ll have a charming fairy garden that adds a touch of magic to your home or garden.
Hanging Fairy Garden Pot With Tiny Swing And Vines

Imagine a charming hanging pot, swaying gently from a tree branch, filled with vibrant flowers and lush green vines. This delightful setup not only adds beauty to your garden but also creates a whimsical fairy garden vibe. The tiny swing nestled among the plants invites thoughts of playful fairies enjoying their magical world.
The pot itself is a classic terracotta, giving it a rustic look that blends perfectly with nature. The flowers, in shades of pink and white, peek out from the top, while the vines gracefully cascade down, adding layers of texture. This design is simple yet enchanting, making it a perfect addition to any garden.
To create your own hanging fairy garden pot, start with a terracotta pot and some sturdy chain or rope for hanging. Fill the pot with potting soil and choose your favorite flowers and vines. Consider using plants like ivy or creeping thyme for a lush appearance. Once planted, hang the pot in a sunny spot, and let your garden flourish.
Don't forget to add small decorative elements like a tiny swing or miniature fairy figurines to enhance the charm. These little touches bring the fairy garden theme to life and spark imagination. This hanging pot not only beautifies your space but also serves as a lovely focal point, drawing the eye and inviting smiles.
Repurpose A Vintage Tin As A Whimsical Fairy Garden Pot

Using a vintage tin as a fairy garden pot is a fun and creative way to bring a touch of magic to your outdoor space. This charming idea allows you to recycle an old tin while creating a delightful scene that can brighten up any garden.
The image shows a beautifully decorated tin pot filled with tiny flowers, colorful stones, and adorable fairy figurines. The vibrant colors of the flowers and the playful figures create a whimsical atmosphere. The tin itself, with its soft blue hue and butterfly design, adds a nostalgic touch, making it a perfect base for your fairy garden.
To create your own fairy garden in a vintage tin, start by gathering materials. You will need:
- A vintage tin (like an old cookie or candy tin)
- Potting soil
- Small plants or flowers
- Decorative stones or pebbles
- Fairy figurines or other miniature decorations
Begin by filling the tin with potting soil, leaving some space at the top. Next, plant your flowers or small plants, arranging them in a way that looks natural. Add decorative stones around the plants for a finished look. Finally, place your fairy figurines in the garden, creating little scenes that tell a story.
This project is not just about aesthetics; it’s also a great way to engage with nature. Watching your plants grow and change over time can be very rewarding. Plus, it’s a wonderful activity to do with kids, sparking their imagination and creativity.
Design A Mushroom-Themed Fairy Garden In A Shallow Pot

Creating a mushroom-themed fairy garden in a shallow pot is a delightful way to bring a touch of whimsy to your space. The image showcases a charming arrangement of colorful mushrooms nestled in vibrant green moss, all set in a rustic pot. This design captures the essence of a magical forest, making it perfect for both indoor and outdoor settings.
To start, choose a shallow pot that complements your home decor. The pot should have drainage holes to keep the plants healthy. Fill it with a layer of potting soil, then add a generous amount of moss. This will serve as the lush landscape for your fairy garden.
Next, select a variety of miniature mushrooms. You can find these in craft stores or online. Look for different colors and sizes to create visual interest. Arrange them in clusters to mimic a natural setting. Consider adding small stones or pebbles around the mushrooms to enhance the garden's earthy feel.
For added charm, include tiny fairy figurines or other whimsical elements. These can be placed among the mushrooms or near the edges of the pot. This will create a story within your garden, inviting viewers to imagine the fairies that might live there.
Finally, place your mushroom-themed fairy garden in a spot where it can be admired. Whether on a windowsill, patio, or garden table, it will surely bring joy and spark creativity. Remember to water the moss lightly to keep it fresh, and enjoy your enchanting creation!
Build A Beach-Style Fairy Garden Pot With Sand And Shell Accents

Creating a beach-style fairy garden pot is a fun and imaginative project. This type of garden brings a slice of the seaside right to your home. Picture a terracotta pot filled with soft sand, tiny seashells, and a cheerful fairy figure. The sandy base mimics a beach, while the shells add a touch of coastal charm.
Start by gathering your materials. You will need a terracotta pot, sand, small seashells, and a fairy figurine. You can also include miniature palm trees to enhance the beach vibe. Arrange the sand in the pot, making sure to leave space for the shells and the fairy. The shells can be scattered around the fairy, creating a natural look.
Next, place the fairy in the center of the pot. Choose a figure that resonates with the beach theme, perhaps one with bright colors or beach attire. The palm trees can be positioned on either side of the fairy, giving the garden a tropical feel. This setup not only looks delightful but also sparks creativity and storytelling.
Finally, consider adding a few more decorative elements. Small starfish or colorful pebbles can enhance the beach atmosphere. You might even want to sprinkle some glitter for a magical touch. This fairy garden pot is not just a decoration; it’s a whimsical escape that can brighten any space.
Turn A Clay Pot Tower Into A Vertical Fairy Garden Scene

Creating a vertical fairy garden using clay pots is a fun and imaginative project. This design allows you to stack pots to form a charming tower, perfect for showcasing tiny fairy figurines and vibrant plants. The image beautifully illustrates this concept, with a multi-tiered arrangement that draws the eye and sparks creativity.
Each level of the pot tower can be filled with different plants and decorative elements. Consider using colorful flowers, small succulents, and even miniature mushrooms to add a whimsical touch. The fairy figurines nestled among the greenery bring the scene to life, creating a magical atmosphere.
To get started, gather your materials. You will need:
- Three or more clay pots of varying sizes
- Potting soil
- Small plants or flowers
- Fairy figurines and decorations
- Optional: pebbles or small stones for added texture
Begin by stacking the pots securely. Fill each pot with soil and plant your chosen greenery. Add the fairy figurines and any decorative items to personalize your garden. Don't forget to water the plants regularly to keep them healthy!
This vertical garden not only saves space but also creates a stunning focal point in your yard or patio. It's a delightful way to express your creativity and enjoy the beauty of nature.
Mini Herb Fairy Garden Pot With Rustic Fairy Cottage

This mini herb fairy garden pot is a delightful blend of nature and whimsy. The rustic fairy cottage, crafted from textured materials, adds a charming touch to the overall design. Its tiny door and chimney evoke a sense of magic, making it a perfect centerpiece for any garden lover.
The pot is filled with a variety of herbs, each contributing to the enchanting atmosphere. You can see vibrant green leaves peeking out, inviting you to imagine the fairies tending to their little garden. Herbs like basil, thyme, and mint not only look great but also offer practical uses in the kitchen.
To create your own mini herb fairy garden, start with a terracotta pot. Choose your favorite herbs and arrange them around the cottage. You can add small stones or pebbles for texture and even a few decorative items like tiny mushrooms or fairy figurines. This project is a fun way to bring a bit of magic into your home while enjoying the benefits of fresh herbs.
Use A Colander Pot To Craft A Fairy Garden With Natural Drainage

Creating a fairy garden in a colander pot is a fun and creative way to bring a touch of magic to your home. The image shows a charming setup with tiny houses, colorful stones, and lush greenery, all nestled in a colander. This unique choice of container not only looks great but also provides excellent drainage for your plants.
Using a colander allows excess water to escape, preventing root rot and keeping your plants healthy. The holes in the colander create a whimsical look, adding to the fairy garden theme. You can fill the bottom with small pebbles to enhance drainage even further. This simple step helps maintain the right moisture level for your plants.
To start your fairy garden, gather some small plants, decorative stones, and miniature figures. Arrange the plants in the colander, placing the taller ones at the back and shorter ones in front. Add your tiny houses and other decorations to create a little village scene. You can even include a small pathway made of stones or beads to guide the fairies through their garden.
Maintaining your fairy garden is easy. Just water the plants as needed and occasionally replace any decorations that may fade or wear out. This project is not only enjoyable but also a great way to express your creativity. Plus, it makes for a lovely conversation piece in your home or garden.
Design A Zen Fairy Garden Pot With Mini Bridge And Stones

Creating a Zen fairy garden pot is a delightful way to bring a touch of magic to your space. This design features a charming mini bridge, smooth stones, and vibrant flowers, all nestled in a cozy pot. The combination of elements creates a serene atmosphere that invites relaxation and joy.
The mini bridge serves as a focal point, drawing the eye and adding a whimsical touch. It symbolizes connection and tranquility, making it perfect for a Zen-inspired garden. Surrounding the bridge are carefully placed stones, which add texture and contrast. These stones can vary in size and color, enhancing the overall visual appeal.
Adding greenery is essential for a lush look. Soft moss or small plants can fill the gaps, providing a vibrant backdrop for the flowers. Choose colorful blooms that complement the stones and bridge. Flowers like daisies and petunias can bring life to the garden, making it feel more inviting.
To create your own Zen fairy garden pot, gather the following materials:
- A medium-sized pot
- Mini bridge decoration
- Assorted smooth stones
- Moss or small plants
- Colorful flowers
Start by placing a layer of moss at the bottom of the pot. Arrange the stones around the moss, leaving space for the bridge. Position the bridge in the center, then fill in with flowers to complete the look. This simple process can result in a beautiful and calming fairy garden.
Make A Fairy Garden Pot Using A Recycled Wooden Crate Liner

Creating a fairy garden pot using a recycled wooden crate liner is a fun and eco-friendly project. This charming garden display can brighten up any space. The image shows a delightful wooden crate filled with miniature fairy figures, flowers, and greenery. It's a perfect example of how to repurpose materials while adding a touch of whimsy to your garden.
Start by gathering your materials. You’ll need a wooden crate liner, potting soil, small plants, and decorative fairy figurines. You can find these items at local craft stores or even in your own backyard. The wooden crate gives a rustic feel, making it an ideal base for your fairy garden.
Next, fill the crate with potting soil. Make sure to pack it down lightly to create a stable foundation for your plants. Choose a variety of small plants that will thrive in the conditions of your garden. Succulents, moss, and small flowering plants work well. Arrange them creatively to create depth and interest.
Once your plants are in place, it’s time to add the fairy figurines. Position them among the plants, as if they are enjoying their little garden. You can also add small decorative items like pebbles, tiny mushrooms, or even a miniature lamp, just like the one in the image. These details enhance the magical feel of your garden.
Finally, place your fairy garden pot in a sunny spot. Water the plants as needed and watch your fairy garden come to life. This project not only recycles materials but also provides a lovely space to relax and enjoy nature. It’s a simple way to bring a bit of enchantment into your home or garden.
Create A Fairy Tree-Stump Pot With Carved Door Details

Creating a fairy tree-stump pot is a delightful way to add charm to your garden. The image shows a beautifully crafted tree stump with a carved door, inviting imagination and whimsy. This design can serve as a perfect home for tiny fairies, making your garden feel magical.
The details in the carving are impressive. The door features a small handle and a lock, suggesting a secret world inside. Surrounding the stump are colorful flowers and playful fairy figurines, enhancing the enchanting atmosphere. This setup encourages creativity, allowing you to personalize the space with your favorite plants and decorations.
To make your own fairy tree-stump pot, start with a suitable container that resembles a tree stump. You can paint it or use textured materials to mimic bark. Next, carve or paint a door on one side. Adding small details like flowers or tiny stones can make it even more inviting. Place it in a sunny spot and surround it with vibrant flowers to create a fairy haven.
Glass Bowl Fairy Garden Pot With Moss And Mini Figurines

Creating a glass bowl fairy garden pot is a delightful way to bring a bit of magic into your space. This charming setup features a clear glass bowl filled with lush green moss, creating a soft, inviting base for your miniature world.
The vibrant moss serves as the perfect backdrop for tiny figurines, like fairies and animals, that add personality and whimsy. Each figurine can tell its own story, whether it's a fairy dancing or a little animal playing. This setup invites creativity and imagination, making it a wonderful project for both kids and adults.
To make your own fairy garden, start with a clean glass bowl. Layer the bottom with small pebbles for drainage, then add a generous amount of moss. You can arrange the mini figurines in a way that feels natural, perhaps placing a fairy near a tiny mushroom or a playful animal beside some flowers. The possibilities are endless!
For added charm, consider including small decorative elements like tiny flowers or colorful stones. These little touches can enhance the overall look and feel of your fairy garden. Plus, it’s a fun way to personalize your creation and make it truly unique.
Once your fairy garden is complete, display it in a sunny spot. The natural light will highlight the colors and textures, making your miniature world come to life. This enchanting project not only beautifies your space but also serves as a lovely reminder of the magic that can be found in everyday life.
Design A Nighttime Fairy Garden Pot With Solar Lights

Creating a nighttime fairy garden pot is a delightful way to add charm to your outdoor space. Imagine a cozy pot filled with vibrant flowers, twinkling lights, and whimsical fairy figurines. The combination of these elements can transform any garden into a magical retreat.
Start by choosing a sturdy pot that can hold soil and plants securely. Fill it with rich potting soil, and select a variety of colorful flowers. Consider using plants like petunias, daisies, or small succulents that thrive in your climate. Arrange them in a way that feels natural, allowing some flowers to spill over the edges for a lush look.
Next, add solar lights to your fairy garden pot. These lights are perfect for illuminating your garden at night. Place them strategically among the flowers, ensuring they catch the eye without overwhelming the plants. Solar lights come in various styles, from tiny fairy lights to larger lanterns, so you can choose what fits your theme best.
Incorporate fairy figurines to complete the look. Choose figures that resonate with you, whether they are playful, serene, or whimsical. Position them among the flowers and lights to create a scene that sparks joy. You might even add small decorative stones or miniature furniture to enhance the fairy tale vibe.
Finally, don’t forget to maintain your fairy garden. Regularly water the plants and clean the solar lights to ensure they shine brightly. With a little care, your nighttime fairy garden pot will be a stunning focal point in your yard, inviting everyone to enjoy its magic.
Stacked Pot Fairy Garden Featuring Multiple Fairy Levels

Creating a stacked pot fairy garden is a delightful way to bring a touch of magic to your outdoor space. This design features multiple levels, each showcasing charming fairy figurines and vibrant plants. The stacked pots create a vertical garden that draws the eye and adds depth to your fairy scene.
In this image, you can see a variety of elements that make this fairy garden enchanting. Each pot is filled with different plants, including succulents and colorful flowers. These plants not only enhance the visual appeal but also provide a cozy environment for the fairies. The use of small stones and moss adds texture and a natural feel to the arrangement.
One of the standout features is the tiny fairy house perched atop the highest pot. This whimsical touch invites imagination and storytelling, making it perfect for children and adults alike. The fairies are positioned in playful poses, engaging with their surroundings, which adds life to the garden.
To create your own stacked pot fairy garden, follow these simple steps:
- Choose a variety of pots in different sizes.
- Fill each pot with potting soil and select plants that thrive in your climate.
- Arrange fairy figurines and decorative elements like stones, miniature houses, and flowers.
- Stack the pots, ensuring stability and balance.
- Water the plants and place your fairy garden in a spot where it can be enjoyed.
This stacked pot design not only maximizes space but also allows for creativity in arranging your fairy garden. Whether you place it on a patio, in a garden, or even indoors, it’s sure to bring smiles and spark imagination.
Create A Fairy Garden In A Painted Flower Pot Village Style

Creating a fairy garden in a painted flower pot is a delightful way to bring a touch of magic to your home. The image showcases a charming setup with two tiny houses nestled in a colorful pot. The vibrant yellow pot is adorned with bright floral designs, making it a cheerful addition to any space.
The two miniature houses, one with a pink roof and the other with a rustic look, create a quaint village feel. Surrounding them are small pebbles that form a pathway, adding to the whimsical charm. Tiny plants and flowers peek out from the soil, enhancing the garden's enchanting atmosphere.
To start your own fairy garden, gather a few supplies: a painted flower pot, miniature houses, small stones, and some soil. You can also add tiny plants or flowers to create a lush environment. Arrange the houses and stones in a way that feels inviting. Don't forget to sprinkle in some fairy figurines or other decorations to complete the look!
This project is perfect for both kids and adults. It encourages creativity and can be a fun activity to do with family or friends. Plus, it’s a great way to brighten up your space and bring a little whimsy into your life.
Use A Concrete Bowl To Build A Modern Fairy Garden Pot

Creating a fairy garden in a concrete bowl is a fun and stylish way to bring a touch of magic to your home. The image shows a beautifully arranged fairy garden, featuring charming little figures and vibrant plants. The concrete bowl adds a modern twist, making it a perfect centerpiece for any space.
The use of a concrete bowl offers several advantages. Firstly, it provides a sturdy base that can withstand outdoor conditions. You won't have to worry about it tipping over in the wind. Secondly, the neutral color of the concrete complements the bright colors of the plants and fairy figures, allowing them to stand out.
To create your own fairy garden in a concrete bowl, follow these simple steps:
- Choose a concrete bowl that fits your style and space.
- Add a layer of small stones or pebbles at the bottom for drainage.
- Layer in potting soil, leaving enough space for your plants.
- Pick a mix of small plants, such as succulents or moss, to create a lush look.
- Place fairy figures and decorative items around the plants to complete the scene.
Don't forget to water your plants regularly and enjoy watching your fairy garden thrive. This project is not only easy but also allows for creativity. You can change the figures or plants with the seasons, keeping your garden fresh and exciting.
Fairy Garden Pot With Water Feature And Mini Pond

A fairy garden pot with a water feature adds a magical touch to any space. This charming design showcases a mini pond surrounded by vibrant flowers and playful fairy figurines. The water feature creates a serene atmosphere, inviting you to relax and enjoy the beauty of nature.
The pot itself is simple yet elegant, providing a perfect backdrop for the enchanting scene. The addition of colorful flowers enhances the visual appeal, making it a delightful focal point in your garden or patio. Each fairy figure seems to have its own personality, bringing life and whimsy to the arrangement.
Creating your own fairy garden pot is easy and fun. Start with a terracotta pot and fill it with soil. Add small stones and moss to form the pond area. You can use a small bowl or dish for the water feature. Place your fairy figurines and flowers around the pond, arranging them to create a balanced look. This project is a wonderful way to express creativity and enjoy gardening.
Consider incorporating different elements like miniature bridges or tiny benches to enhance the scene. You can also change the flowers with the seasons for a fresh look throughout the year. This fairy garden pot not only beautifies your space but also sparks joy and imagination.
Turn A Lantern Into An Enclosed Fairy Garden Pot Display

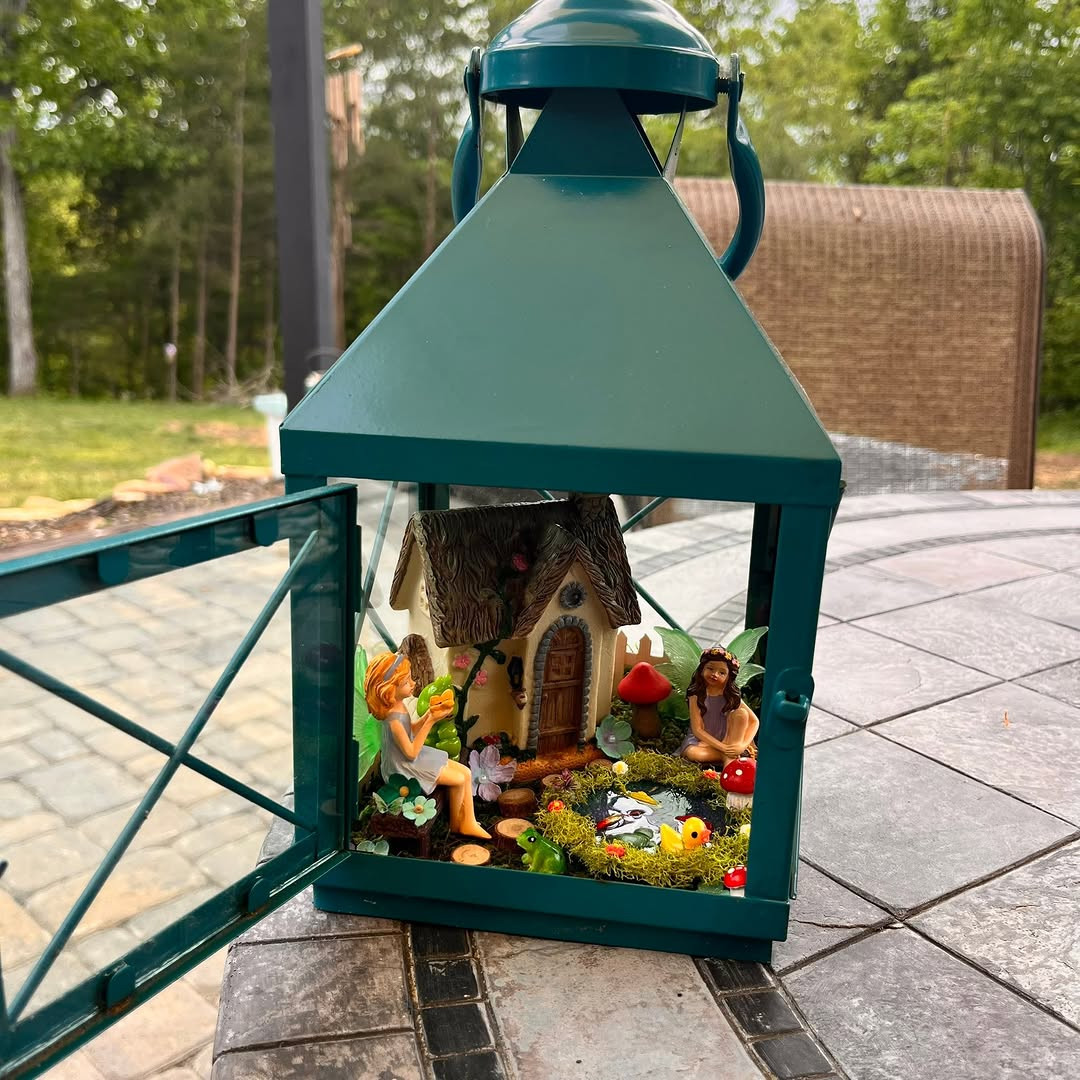
Transforming a lantern into a fairy garden pot is a delightful project that adds charm to any space. The image shows a beautifully crafted lantern filled with tiny fairy figurines, colorful stones, and lush greenery. This setup creates a whimsical atmosphere that invites imagination and joy.
To start, choose a lantern that suits your style. It can be vintage or modern, but make sure it has enough space for your fairy garden. Remove any internal components that are not needed, like the light fixture, to create a cozy environment for your miniatures.
Next, layer the bottom with pebbles for drainage, followed by potting soil. This will help maintain the health of your plants. You can use a variety of small plants, like succulents or moss, to create a vibrant landscape. The greenery will contrast beautifully with the colorful stones and figurines.
When placing your fairy figurines, think about the story you want to tell. Position them in playful poses, perhaps one is watering a plant while another is playing with a small animal. This adds life to your display and makes it more engaging.
Finally, consider adding small decorative elements like tiny flowers or miniature furniture to enhance the scene. Once everything is in place, close the lantern and find a sunny spot to display your creation. The glass will protect your fairy garden while allowing sunlight to nourish the plants.
Design A Seasonal Spring Fairy Garden Pot With Blossoms

Creating a spring fairy garden pot is a delightful way to welcome the season. This charming pot features two whimsical fairies enjoying a sunny day under a bright umbrella. Surrounding them are colorful blossoms, each adding a touch of magic to the scene. The vibrant flowers, including daisies and other blooms, create a lively atmosphere that captures the essence of spring.
To start your own fairy garden, choose a pot that fits your space. A medium-sized terracotta pot works well, providing enough room for plants and decorations. Fill the bottom with potting soil and add a layer of moss for a lush look. Next, select a variety of small flowers to plant. Consider using daisies, pansies, and other seasonal blooms that thrive in spring.
Once your flowers are planted, it's time to add fairy figurines and accessories. Look for small decorations like tiny chairs, umbrellas, or even miniature stones to enhance the garden's charm. Position the fairies in a way that tells a story, perhaps having them sit together or play among the flowers. This adds a personal touch and makes the garden feel alive.
Lastly, place your fairy garden pot in a sunny spot where it can soak up the light. Regular watering and care will keep your flowers vibrant and healthy. Enjoy watching your garden grow and change throughout the season, bringing a little magic to your home.
Fairy Garden Pot Centered Around A Mini Windmill

Creating a fairy garden pot with a mini windmill is a delightful way to bring a touch of whimsy to your outdoor or indoor space. The windmill serves as a charming focal point, drawing the eye and sparking imagination. In this setup, the windmill stands tall amidst a vibrant array of flowers, making it feel like a scene straight out of a storybook.
The flowers surrounding the windmill add splashes of color and life. You can choose a mix of bright blooms like daisies, petunias, and pansies to create a cheerful atmosphere. These flowers not only enhance the visual appeal but also attract butterflies and other pollinators, further enriching your fairy garden.
Adding small figurines, like a little gardener, can bring personality to your garden. This tiny character can be positioned near the windmill, making it look like they are tending to the flowers. You can also include stones or pebbles around the base for a natural touch, giving the garden a more grounded feel.
To create your own mini windmill fairy garden, start with a suitable pot. Choose one that complements the colors of your flowers. Fill it with potting soil, then arrange your flowers and the windmill. Remember to leave some space for the figurines and decorative stones. Water the plants regularly and watch your fairy garden flourish!
Create A Storybook Fairy Garden Pot With Archway Entrance

Imagine a charming fairy garden pot that invites you into a magical world. The centerpiece is an archway entrance, crafted from stone, leading to a whimsical space filled with vibrant flowers and playful decorations. This setup not only adds beauty to your garden but also sparks creativity and storytelling.
The archway stands tall, welcoming visitors with its rustic wooden door. Surrounding it are colorful blooms, like pink and yellow flowers, that bring life and cheer to the scene. The use of natural elements, such as rocks and moss, enhances the garden's enchanting feel, making it a delightful spot to relax and enjoy nature.
To create your own storybook fairy garden pot, start with a sturdy terracotta pot. Fill it with potting soil and arrange small stones around the base. Choose a variety of flowers that thrive in your climate, ensuring a splash of color. Place your archway at the center, and add a tiny figure to bring the scene to life. This personal touch makes the garden feel like a little world of its own.
Consider adding small accessories like miniature benches, tiny lanterns, or even a small pond to enhance the fairy tale vibe. Each element can tell a story, inviting you to imagine the adventures that unfold in this magical space. With a little creativity and care, your fairy garden pot will become a cherished part of your outdoor decor.
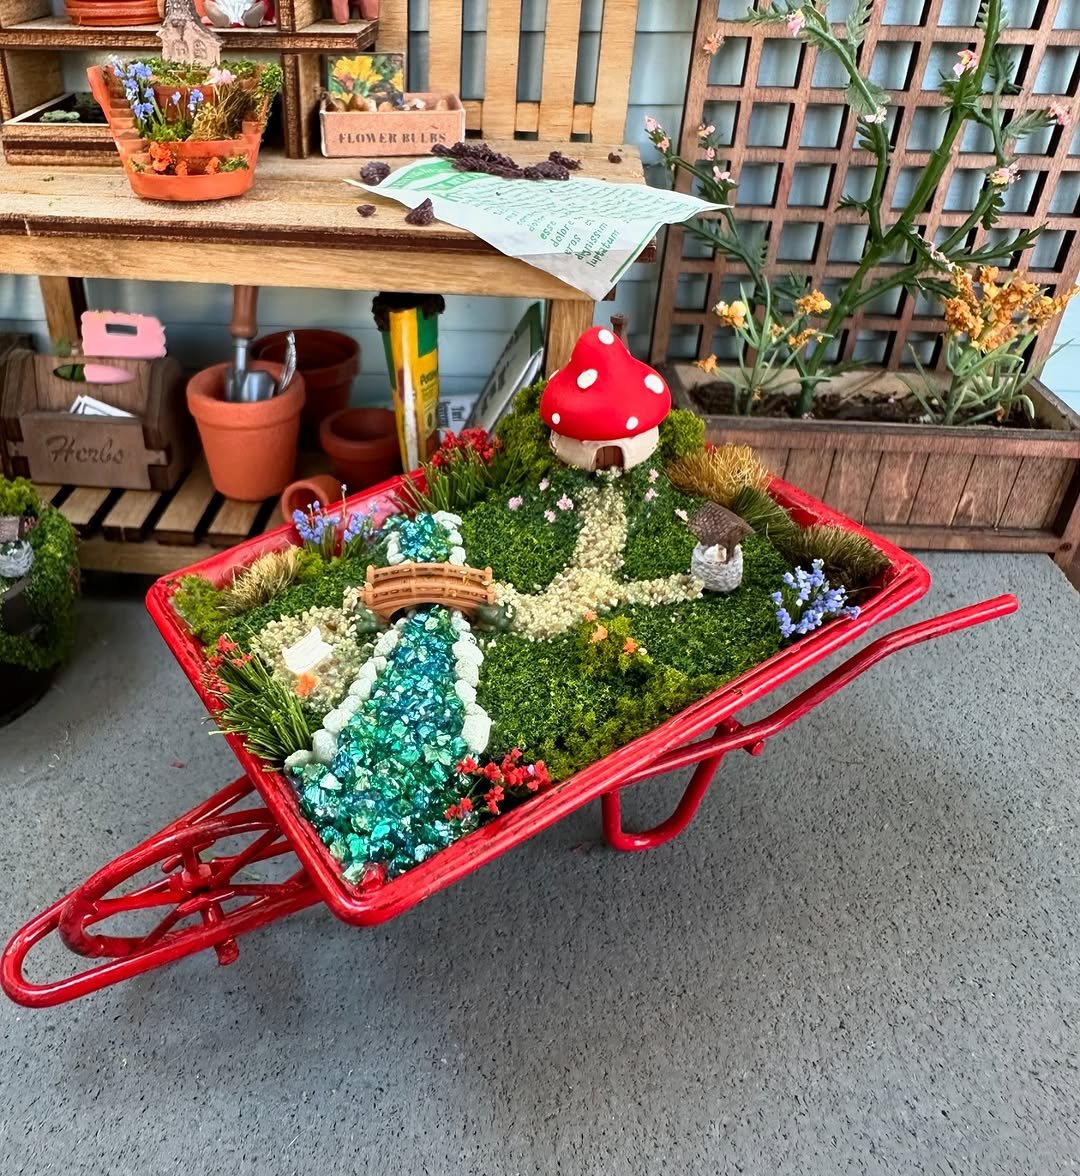
Use A Wheelbarrow Planter For A Large Fairy Garden Pot

A wheelbarrow planter is a fun and creative way to create a large fairy garden. This unique approach adds charm and character to your outdoor space. The image shows a vibrant wheelbarrow filled with colorful flowers and tiny fairy figurines, making it a delightful focal point.
Start by choosing a wheelbarrow that suits your style. You can go for a classic red one, like in the image, or opt for a more rustic look with a wooden or metal design. The size of the wheelbarrow allows for plenty of plants, giving you the freedom to mix and match different flowers and greenery.
When planting, consider using a variety of flowers that bloom at different times. This ensures that your fairy garden looks lively throughout the seasons. Some great options include daisies, marigolds, and petunias. You can also add small plants like moss or succulents to create texture and depth.
Don’t forget to include fairy figurines to bring your garden to life. Place them among the flowers or on the edges of the wheelbarrow for a whimsical touch. You can even create little scenes, like a fairy tea party or a magical gathering.
Finally, position your wheelbarrow planter in a spot where it can be easily seen and enjoyed. Whether it’s on your patio, in the garden, or near a seating area, it will surely brighten up your space and spark joy.
Design A Fairy Garden Pot Inspired By A Forest Clearing

Creating a fairy garden pot that captures the essence of a forest clearing can be a delightful project. The image showcases a charming arrangement that brings together elements of nature and whimsy. The combination of vibrant trees, cozy little houses, and a serene pond creates a magical atmosphere.
Start by choosing a pot that resembles a natural setting. A wooden or earthy-toned pot works well. Fill it with a mix of soil and moss to mimic the forest floor. The moss adds a lush, green touch, making it feel alive. You can also use small pebbles to outline pathways or create a border around the pond.
Next, add miniature trees to represent the forest. The image features a mix of tall evergreen trees and a striking red tree, which adds a pop of color. These trees can be made from various materials, like felt or plastic, and can be placed at different heights for depth.
Incorporate tiny houses to create a sense of community in your fairy garden. The houses in the image are quaint and inviting, perfect for any fairy. Position them near the pond or along the pathways to make the scene feel more cohesive. You can even personalize the houses with small decorations or paint.
Finally, don’t forget the flowers! Small, colorful blooms scattered throughout the garden add vibrancy and life. Use a variety of colors to create a cheerful look. Place them near the pond or along the pathways to draw the eye and enhance the fairy tale feel.
Mini Cottage Fairy Garden Pot With Thatched Roof Look

This mini cottage fairy garden pot is a delightful addition to any garden or indoor space. The charming thatched roof gives it a cozy, rustic feel, making it perfect for those who love a touch of whimsy in their decor.
The pot itself is simple yet effective, with a terracotta base that provides a warm contrast to the vibrant colors of the decorations. The tiny cottage features intricate details, such as a small door and windows, which invite imagination and storytelling.
Surrounding the cottage, a lush green moss adds a natural touch, while colorful flowers bring life and vibrancy to the scene. These flowers can be crafted from various materials, allowing for creativity in choosing colors and styles.
To create your own version of this fairy garden pot, gather materials like a small terracotta pot, moss, miniature flowers, and a tiny cottage figurine. Arrange the moss at the base, place the cottage in the center, and scatter the flowers around for a magical effect.
This project is not just fun; it can also be a great way to spend time with family or friends. You can even host a fairy garden-making party where everyone creates their unique designs. The possibilities are endless!
Create A Fairy Garden Pot Using A Shallow Bonsai Planter

Creating a fairy garden pot using a shallow bonsai planter is a delightful project that brings a touch of magic to your space. The image showcases a charming bonsai pot filled with tiny plants, colorful stones, and whimsical fairy figurines. This setup invites creativity and imagination, making it perfect for both kids and adults.
Start by selecting a shallow bonsai planter that suits your style. The pot should have good drainage to keep your plants healthy. Fill it with potting soil, leaving enough space for your fairy accessories. Choose small plants like succulents or moss that thrive in compact spaces. These plants not only look lovely but are also easy to care for.
Next, add decorative elements. The image features smooth stones in various colors, which add texture and interest. You can also include miniature items like bridges or fairy figurines to create a story within your garden. Position these elements thoughtfully to create a balanced look. Consider using a mix of larger and smaller stones to create depth.
Don’t forget to personalize your fairy garden! You can paint the stones or add tiny signs to give it a unique touch. This is where your creativity shines. Arrange the plants and decorations in a way that feels right to you. Remember, there are no strict rules—just let your imagination guide you!
Finally, place your fairy garden pot in a spot where it can be admired. Whether it's on a windowsill, patio, or garden table, it will surely brighten up the area. Regularly check on your plants and give them the care they need. With a little attention, your fairy garden will flourish and continue to inspire joy.
Fairy Garden Pot With Stone Cottage And Mossy Roof

This charming fairy garden pot features a delightful stone cottage with a mossy roof, creating a magical atmosphere. The cottage is crafted with intricate details, showcasing a warm, inviting door and round windows that add character. The moss on the roof gives it a natural look, blending perfectly with the surrounding greenery.
In front of the cottage, a little figure sits comfortably, adding a playful touch to the scene. The figure seems to enjoy the serene environment, surrounded by blooming flowers and lush moss. A small stone pathway leads to the door, enhancing the whimsical feel of the garden.
To create a similar fairy garden pot, consider these steps:
- Choose a suitable pot that complements your garden theme.
- Add a layer of soil and then place the stone cottage in the center.
- Surround the cottage with moss, small plants, and flowers for a vibrant look.
- Include miniature figures or accessories to bring your fairy garden to life.
This fairy garden pot is not just a decoration; it invites imagination and joy. It’s perfect for any garden space, whether indoors or outdoors. You can easily customize it to reflect your personality or seasonal themes.